Master seamless image edits: learn to remove backgrounds easily!
Ever wondered how professional images appear so clean, with subjects perfectly isolated from their surroundings? Or perhaps you’ve tried to create a transparent logo from a photo and ended up with jagged edges? For beginners in graphic and digital design, learning to remove backgrounds from images is a fundamental skill that unlocks countless creative possibilities. It’s not just about aesthetics; it’s about clarity, versatility, and making your visuals truly pop in any project, from social media posts to professional presentations.
This guide will demystify the process of background removal, focusing on accessible tools and practical, step-by-step methods. You’ll learn how to achieve clean, crisp cutouts, understand which tools are best for different scenarios, and discover how this seemingly complex task can be made simple. Mastering background removal will elevate your designs, allowing you to seamlessly integrate elements, create stunning composites, and ensure your main subject always takes center stage.
Table of Contents
Why clean images matter: The power of a transparent background
A clean image, often with a transparent background, is invaluable in modern design. It allows for incredible flexibility and professionalism. Imagine trying to place a product photo on a website if it still had its original cluttered background – it would look messy and unprofessional. Removing the background ensures your subject integrates smoothly into any new design, maintaining a polished and cohesive look.
This technique is crucial for e-commerce (think product photos on white backgrounds), creating marketing materials (placing your subject over custom graphics), and even personal branding (a professional profile picture with a clean, consistent look). It enhances focus, reduces visual clutter, and makes your designs more adaptable and impactful. A transparent background empowers you to tell your visual story exactly how you intend it, without distracting elements.
Your free powerhouse: Removing backgrounds with Photopea
For beginners seeking a powerful yet free solution, Photopea is an excellent choice. This online photo editor remarkably mimics professional software like Adobe Photoshop, offering robust tools for precise background removal directly in your web browser. It’s perfect for detailed cutouts where other simpler tools might fall short.
Step-by-step: How to remove backgrounds in Photopea
Let’s walk through a common scenario: removing the background from a product image to place it on a new marketing flyer.
1. Open your image in Photopea
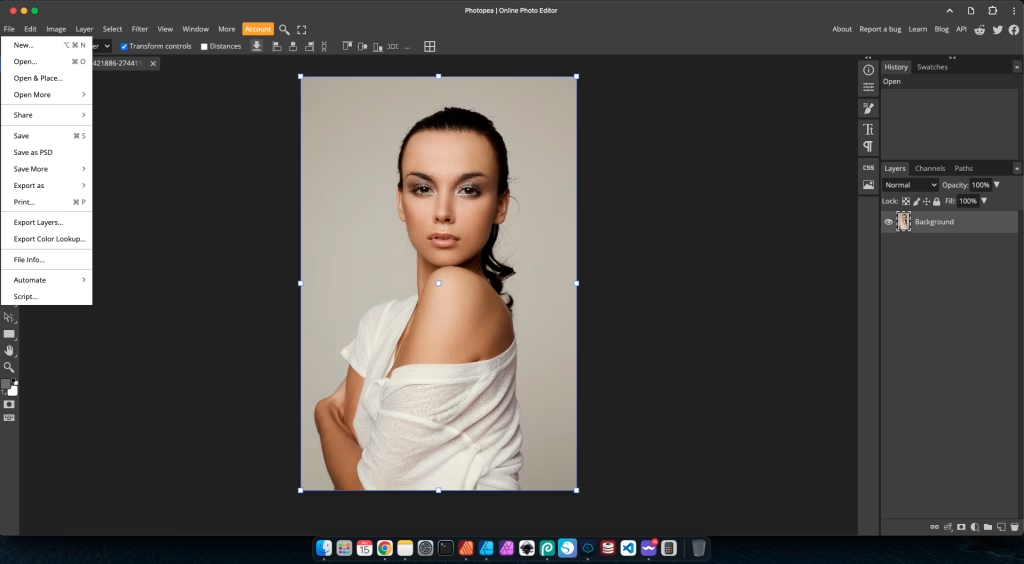
Navigate to Photopea.com. Once the interface loads, go to File > Open and select the image from your computer that has the background you wish to remove. Your image will appear on the canvas.
2. Duplicate the layer (best practice)
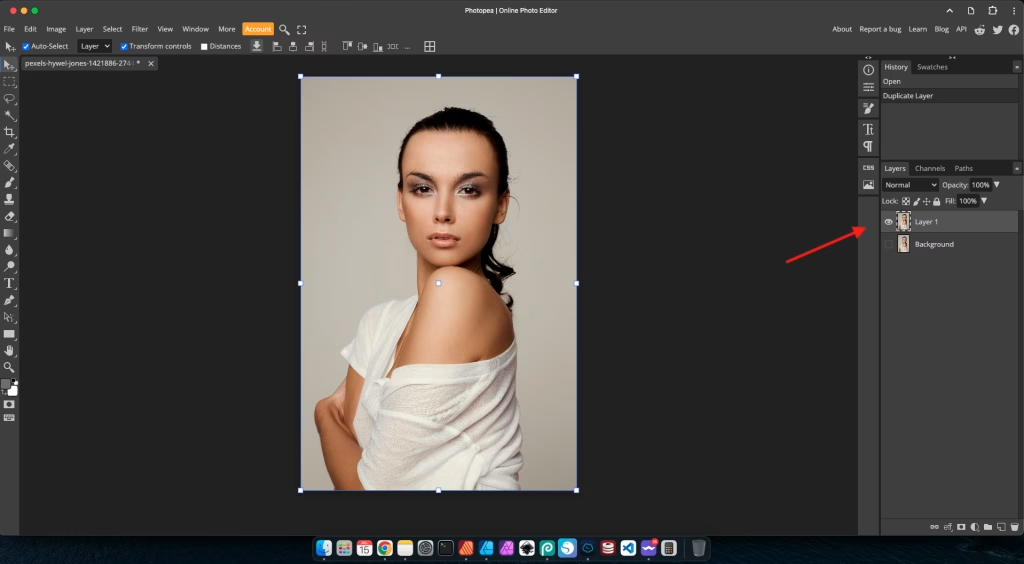
In the “Layers” panel (usually on the right side), right-click on your image layer (often named “Background” with a padlock icon) and select Duplicate Layer. Then, click the eye icon next to the original “Background” layer to hide it. This ensures you’re working non-destructively, preserving your original image.
3. Choose your selection tool
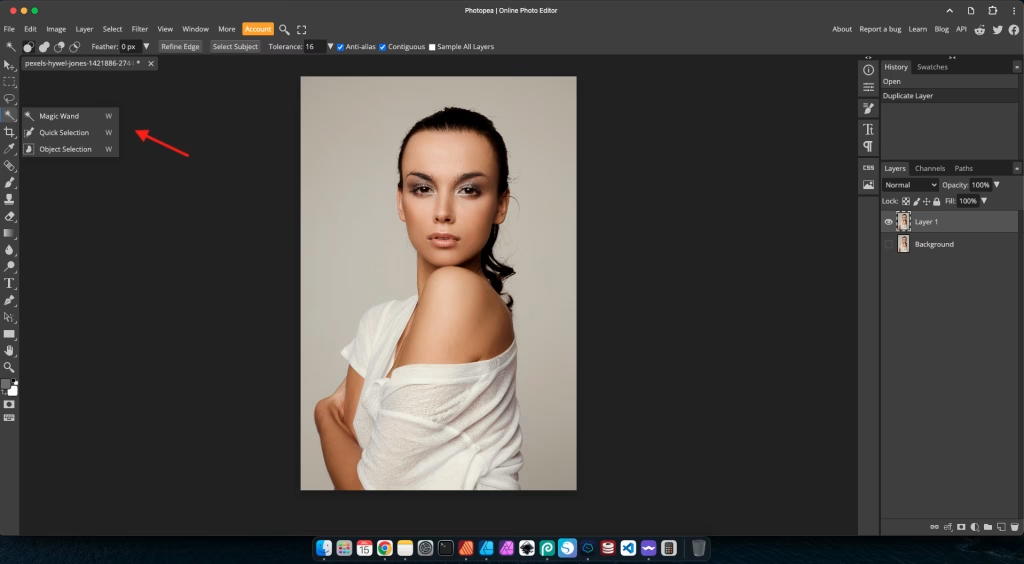
Photopea offers several powerful tools for selection. The best one depends on your image’s background:
- Magic Wand Tool (W): Ideal for solid, uniform backgrounds (e.g., a product on a pure white or colored backdrop). Click on the background area, and it will select similar pixels. Adjust the “Tolerance” in the top bar to control how much it selects.
- Quick Selection Tool (W): Great for more complex, but still relatively distinct, backgrounds. “Paint” over the areas you want to select (or deselect), and Photopea will intelligently detect edges.
- Pen Tool (P): For highly precise cutouts, especially around intricate or soft edges (like hair). This tool creates vector paths that you can convert into selections. It has a steeper learning curve but offers ultimate control.
For simple backgrounds, the Magic Wand Tool is often the quickest. For product photos with clear edges, the Quick Selection Tool is very effective.
4. Make your selection and refine it
Using your chosen tool, select the background area you want to remove. You’ll see a “marching ants” outline around your selection. If the initial selection isn’t perfect, use the options in the top bar:
- Add to Selection / Subtract from Selection: Use these modes (often represented by plus and minus icons) to refine your selection manually.
- Refine Edge: This is a crucial step for a clean cutout. After making your initial selection, click the Refine Edge button (usually found in the top bar after a selection tool is active). This dialog box allows you to smooth edges, feather the selection, and decontaminate colors, making your cutout look much more natural, especially for intricate details like hair or fur. Adjust the “Radius” and “Smooth” sliders for the best result.
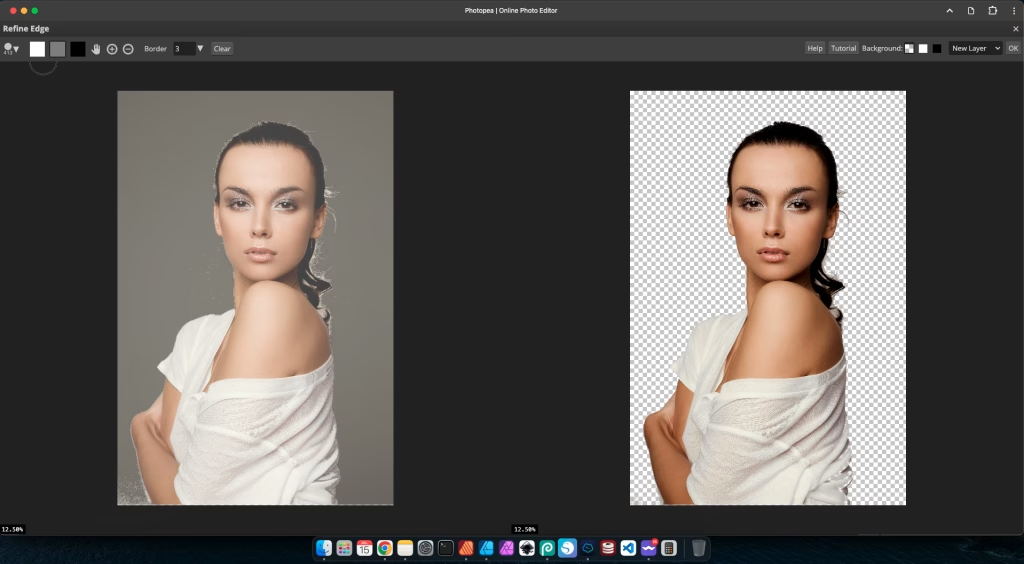
5. Delete the background or apply a layer mask
Once your selection is refined:
- Delete: If you’re okay with permanently removing the background, press the Delete key on your keyboard.
- Layer Mask (Recommended for flexibility): Click the Add Raster Mask icon (a rectangle with a circle inside) at the bottom of the Layers panel. This non-destructively hides the selected background, allowing you to easily go back and refine it later if needed. White on the mask reveals, black conceals.
Your image should now have a transparent (checkerboard) background!
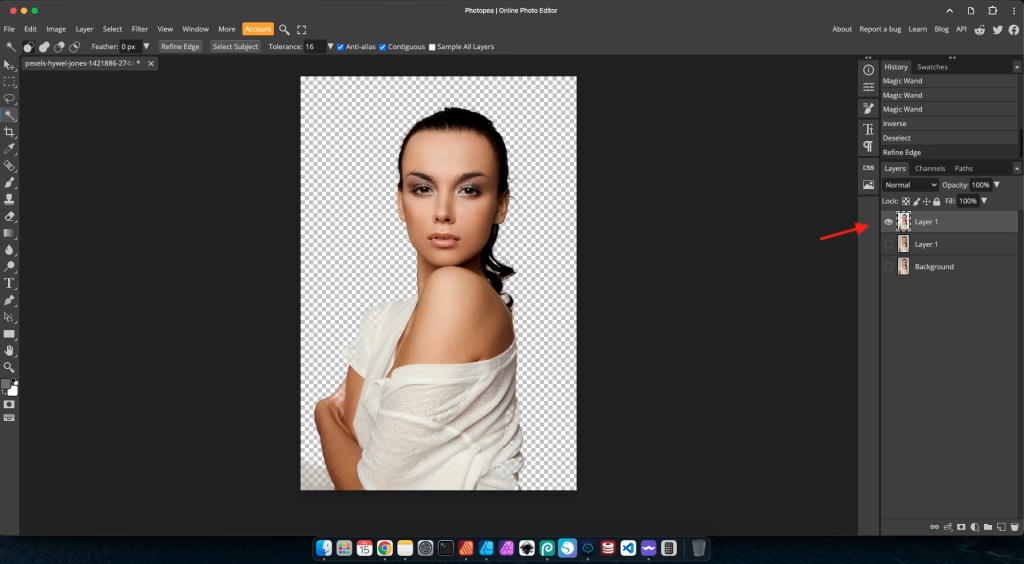
6. Save your clean image
Go to File > Export as and choose PNG. PNG is essential because it supports transparency, preserving your removed background. JPEG files do not support transparency and will add a white background back to your image.
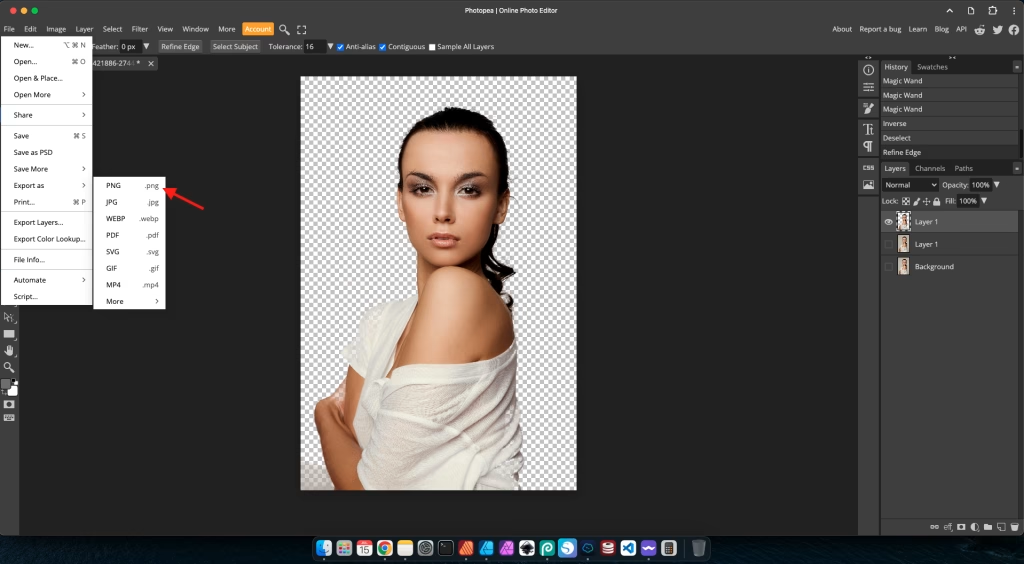
Other tools for background removal: Canva vs. Photoshop
While Photopea offers robust control, other tools provide different approaches to background removal, each with its own advantages for beginners.
Canva: Quick & easy for simple cases
Canva is a popular choice for its simplicity and vast template library. Its background remover feature (often a “Pro” feature or with limited free uses) is incredibly user-friendly, usually a single click. It excels with images that have very clear distinctions between the subject and a solid or simple background. For a quick social media post where perfection isn’t paramount, Canva is a fantastic time-saver. However, for intricate details or complex backgrounds, it might struggle to produce a clean edge, requiring manual cleanup in another tool.
Adobe Photoshop: The industry standard for precision
Adobe Photoshop is the professional benchmark for image manipulation, including background removal. It offers the most advanced tools for precision (like the Pen Tool, Select and Mask workspace, and various selection tools) to achieve flawless cutouts, even from the most challenging images (e.g., intricate hair, complex textures). While it has a steeper learning curve and requires a paid subscription, Photoshop provides unparalleled control and quality for professional-grade results. Many experienced designers will use Photoshop for the initial background removal before importing the transparent image into other design software.
Practical applications: Where clean images shine
Mastering background removal isn’t just a cool trick; it’s a practical skill with many real-world applications for beginners in design:
- E-commerce Product Photography: Placing products on a clean, white, or transparent background is standard for online stores, making products look professional and consistent.
- Professional Profile Pictures: Remove distracting backgrounds from your headshots for LinkedIn, personal websites, or online portfolios to present a polished image.
- Creating Marketing Collateral: Seamlessly integrate custom graphics and text behind a subject for flyers, posters, or social media ads.
- Designing Logos and Icons: If you’re starting with a raster image, removing the background is the first step to isolating the main element for logo creation or icon design.
- Photo Compositing: Combine multiple images with transparent backgrounds to create new scenes or visual narratives.
Tips for cleaner cutouts & best practices
- Start with Good Source Images: The better the original photo (good lighting, clear contrast between subject and background), the easier background removal will be.
- Always Use PNG: When saving an image with a transparent background, always export it as a PNG file. JPEG does not support transparency and will automatically fill the transparent areas with white.
- Learn Layer Masks: Embrace layer masks for non-destructive editing. This means you can always go back and refine your selection without permanently deleting pixels from your original image.
- Zoom In for Detail: Always zoom in close to your image when refining edges. What looks clean from a distance might have jagged or pixelated areas up close.
- Feather Edges Slightly: Sometimes, a very slight feather (a soft blur) on the edge of your cutout can make it blend more naturally into a new background, especially for organic subjects.
- Practice, Practice, Practice: The more you practice, the more intuitive the selection tools will become, and the better your eye will get at spotting imperfections.
Conclusion: Unlock your creative freedom
Learning to remove backgrounds from images is a truly empowering skill for any aspiring designer. It transforms your ability to manipulate visuals, allowing you to create cleaner, more professional, and infinitely more versatile designs. By leveraging tools like Photopea for precision, Canva for speed, and understanding the power of industry standards like Photoshop, you gain control over your visual narratives.
Don’t let cluttered backgrounds limit your creative vision. Embrace these tools and techniques, practice consistently, and soon you’ll be creating seamless image composites that truly stand out. Your journey to producing polished, impactful visuals begins with the power of a clean image. Keep experimenting, keep learning, and enjoy the freedom that comes with mastering this essential design skill!
Leituras recomendadas:
– Canva vs Photopea: Choose Your First Free Design Tool – Discover the strengths of two popular free design tools to kickstart your creative projects.
External Reference:
Adobe Photoshop: Remove image backgrounds – Explore official Adobe resources for in-depth techniques on background removal in Photoshop.


